Scope Bases for Long-Range Shooting
January 23, 2015 2:12 amA common problem encountered with fifty caliber rifles intended for shooting beyond 1000 yards is not having enough vertical scope adjustment to hit the target. Usually it’s not a problem to get on at 1000 yards, requiring about 25 minutes of up adjustment. But beyond 1000 yards, trajectories fall off fast. Most fifty caliber shooters that I know, and others shooting cartridges like the 30/378 Weatherby and 338/416 Rigby, zero their rifles at 100 yards and work off that zero for all other ranges.
Most internally adjustable target scopes have from 50-60 minutes of total vertical adjustment. With a normal scope base and ring configuration, a 100 yard zero will put the adjustment in about its mid range. With a total of 60 minutes of adjustment, that leaves only about 30 mininutes remaining. So we can see why we will soon run out of scope beyond 1000 yards. With the newer bullets now available, with a C1 ballistic coefficient of 1.0 or better, and fired at reasonable 50 BMG velocities, the bullet will remain supersonic out to 2500 yards or so. It takes a lot of adjustment to get zeroed out where the deer and antelope play, but it can be achieved with certain scopes and the right base.
The answer is to tip the scope down in front to take advantage of the full adjustment range. Some manufacturers of fifties provide bases with their rifles or actions that already have the slope built into them. But what if we have a rifle that doesn’t have one of these bases, or it is wrong for our scope? Well, there is a simple formula for determining the correct amount of slope.
Let’s say that we’re using a 36x target scope and we find that with a 100 yard zero the scope still has 25 minutes of down adjustment left. This means the scope won’t have those same 25 minutes for long shots where it will be needed. It’s easy to figure how much to tip the scope to get that adjustment back. If we decide to leave 5 minutes of adjustment, then we want to tip the scope an amount that would move the scope’s reticle 20″ at 100 yards. Next we need to know the distance from the front of the forward base to the back of the rear base. Or in the case of a one piece base, its overall length. Now to find the answer, we divide the 20″ of desired movement by 3600 (the number of inches in 100 yards) and multiply by the scope base distance mentioned earlier. If the base measurement was 7″, this would look like (20/3600) x 7 = .039″. So the rear base should be elevated that amount.
I prefer to mill the scope base on an angle, as opposed to shimming the rear base to achieve the slope. This does not put any bind into the scope as shimming would do. The base is placed in the milling machine upside-down, with the front end elevated the calculated amount. Here the front of the base is raised so when it is installed on the action the rear will be higher.
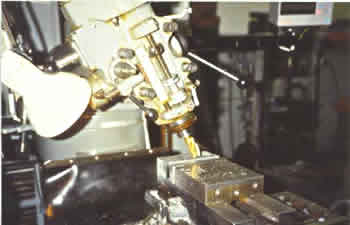
If the action has a flat top, the base is simply milled flat with an end mill. For a round action, it’s also easy to mill the correct radius on the bottom of the base for the particular action. Using an end mill that is slightly wider than the base, the milling machine head is tipped at an angle either to the left or the right, along the machine’s X axis. The exact angle depends on both the diameter of the cutter and the radius needed. There is also a simple formula for approximating this angle, if we know the diameter of the cutter and the desired radius to be cut. The formula is SINE A = R/DR, where SINE is the trigonometric function, A is the angle of the milling machine head; R is the radius of the end mill; and DR is the desired radius to be cut. For example, if we use a 1″ diameter end mill and the action is 2″ in diameter, the formula would look like this: SINE A = .5/1. The angle would be 30 degrees. Actually this formula will not always yield the exact angle, but will get it within a degree or two. Experimenting with some scrap steel is an easy way to find it once you are close.
I can offer a few combinations that have worked for me. With a .980″ diameter end mill, 31 degrees will mill a radius for a 1.75″ diameter action. With a 1.25″ diameter cutter, 35.5 degrees will work for a 2″ diameter receiver. For the same diameter action, a .725″ diameter end mill should be tipped at 17 degrees.
I hope that I haven’t made this too confusing. In practice, all of this is a simple operation. The scope base is held both tipped and upside down in the milling machine vise so that a radius matching the diameter of the receiver can be milled onto it. In order to achieve the correct radius with conventional tooling, the milling machine head is also tipped whereby a relatively small diameter cutter can mill a radius much larger than the cutter’s actual radius.
It’s probably best not to set the scope so that it’s completely out of down adjustment at 100 yards. Later we might change loads or muzzle brakes or barrels and find that the impact point has shifted. I like to leave from 5 to 10 minutes of adjustment in reserve. Using a conventional internal target scope, the amount of tip will probably be about .030″ – .040″ depending on the ring spacing. With a scope like the Leupold MK 4 with its huge 140+ minutes of total adjustment, the difference will be more like .100″ – .125″.
Using this simple formula, we can make minimal work out of slope calculations and get the maximum from our scopes. These same principles apply to elevating the rear mount on a Unertl scope, too. Happy clicking!