Chambering a 50 Caliber Rifle Barrel
There is, in my estimation, a shortage of accuracy minded gunsmiths capable of, and willing to chamber 50 caliber rifle barrels. While I’m no longer involved in the gunsmithing end of rifle barrels, I do know a little about the subject and thought I’d pass on what I’ve learned. And perhaps stir up some latent desire in a few readers who have had an interest in machine work and who might want to try chambering their own barrel. A few basic tools are required, including a lathe and appropriate chambering reamers. In the photos accompanying this article some of these items can be seen. In this discussion we will be dealing with a single shot bolt action, made by McBros of Phoenix, Arizona. Other bolt actions would be similar. Although semi-autos are a little more advanced, the basic steps are the same. The reamers shown were made by Pacific Precision Grinding and I am well pleased with their performance. I’ve also used 50 BMG reamers made by Clymer, they worked very well too.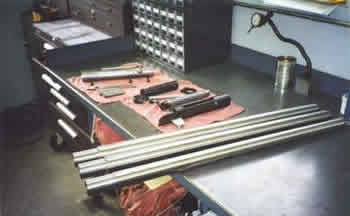
Getting ready to chamber a few barrels. Two McBros actions, a muzzle brake, reamers, and the barrels.

I would then set the barrel up between centers in the lathe and cut the thread shank dimensions as we have just measured them and indicated in the sketch. To allow a little clearance between the thread crest on the barrel and thread root in the receiver, I would turn the thread shank to about 1.495″ in diameter. It is important that the threads are a close fit to the receiver and that the shoulder on the barrel is cut clean and square. I like to use a little thread cutting fluid like Tap Magic and make light passes when cutting threads. The barrel should be removed from the lathe and the thread fit checked in the action. By turning the barrel between centers and using a lathe dog, the barrel can be removed and replaced in the lathe exactly as it was. This is accomplished by returning the dog to the same hole in the face plate, if one is used. On my lathe I don’t use a face plate, I hold a machined center in the chuck and let the dog contact one of the chuck jaws. An experienced eye knows when the thread depth looks right but its best to check the fit often when nearing the final pass or to check the pitch diameter with a thread micrometer. My next step would be to cut the cone in the end of the barrel. To do so I hold the barrel by the muzzle end in a 3-jaw chuck and run the steady rest directly on the threads just cut. Often times I’ll turn a short band on the muzzle end of the barrel while it is still between centers and hold the barrel in the chuck later on this turned surface. I run the steady rest on the threads because I know they are true to the bore, having been cut between centers. It is important to have the barrel running true in the steady rest. Some gunsmiths confirm that it is by pushing a tight fitting plug into the barrel bore and checking for run-out with a dial test indicator. Because the cone on the McBros bolt is machined to a 120 degree included angle, I set the lathe compound angle to 30 degrees (120 + 30 + 30 = 180). Cutting the cone to the correct depth is easy. I’ll first cut it to a depth that looks to be close to finished size, but is obviously not quite there yet. I’ll then remove the barrel from the lathe, put the recoil lug in place and screw the barrel into the action. I have the bolt in the closed and cocked position in the receiver. Since the cone is not cut to full depth, the barrel will not turn into the action completely, it will stop when the unfinished cone contacts the bolt. I’ll then measure the gap between the recoil lug and the shoulder on the barrel with feeler gauges. As an example, let’s say that on the first try I measure a space of .045″. So, in order to get the cone to the correct depth we need to machine the cone that much deeper. Right? Well its not quite that simple but almost so. To be able to easily open and close the bolt we need a little clearance between the bolt nose and the end of the barrel. I like about a .005″ space here, so we simply add the .045″ to .005″ for a total of .050″. To accurately determine this depth, the lathe carriage travel must be measured. Some lathes have the hand wheel graduated for travel or the lathe might be equipped with a digital readout on the x-axis. As a last resort a dial indicator, reading in thousandths, can be setup and carriage travel read directly off of it. This bolt to barrel clearance has been referred to as “gap space” and unlike popcorn or ice cream, too much is worse than too little. If we were to section a 50 BMG case and look at the web inside we can see where the case wall ends and web begins. All of the case wall must be supported by the barrel chamber or the case could rupture at this point, with possible disastrous results. The barrel should now be checked in the receiver for correct fit with the bolt. With the bolt in the closed but not cocked position, there should be a little noticeable movement if the bolt is pushed ahead, about .005″ movement. If there is too little or too much, the cone should be moved accordingly. Too much space can be corrected by moving the barrel shoulder ahead. And if too little, the cone needs to be machined deeper. With the barrel now fit up correctly it is time to start cutting the chamber. My reamers are designed to accept removable pilots of different diameters and the first step is to find a pilot that will just slip into the barrel bore. For the 50 BMG, the nominal bore diameter is .500″. We don’t want a pilot that is too tight or it may damage the lands during the chambering process. I think about .0003″-.0005″ under actual bore diameter is about right for a fifty barrel. When chambering for the 50 BMG I run the lathe at 125 RPM’s. This speed is slower than I use for smaller calibers but seems to be about right for my reamers and lathe. While cutting, I squirt a lot of cutting oil on both the reamer and into the barrel. I use Chevron 505 metal cutting fluid for this because I buy it by the 55 gallon barrel for other applications, but other cutting oils work well too. When chambering for big cases, like the 50 BMG, I push the reamer with a center in the tail stock and hold the reamer with a wrench. For smaller calibers I use a floating reamer holder made by JGS. Because the 50 BMG chamber removes a lot of steel from the barrel, I like to save time and wear on the reamer (especially the throat portion) by using a twist drill to remove the bulk of the steel. I pick a drill that is about .075″ in diameter under the shoulder diameter of the reamer. The drill is run into the barrel to a depth of about .1″ less than the finished chamber will be. But before I start the drilling, I cut the chamber with the reamer to a point where the major diameter of the reamer shoulder has cut about .050″ into the barrel. This gives the twist drill a cone to start drilling against, that was cut by the piloted reamer. Using this method, I’ve never had a drill wander off course. For smaller calibers I have a drill ground to accept a pilot which further ensures that the drill follows the barrel bore. After drilling, I’ll put the reamer back into the lathe and cut about .1″ per pass. I then clean the chips from the reamer flutes and blow chips out of the barrel with compressed air. Before starting again, I’ll squirt everything with more cutting fluid. When the chamber appears to be getting close to depth. I’ll put the headspace “go” gauge into the chamber and “eyeball” its depth. If it looks to be within .1″ or so, I’ll remove the barrel from the lathe and screw it in to action with the bolt and recoil lug in place. With the “go” gauge in the chamber, I’ll screw the barrel into the receiver until I feel it come up tight on the gauge. Then with the feeler gauges I’ll check the gap between the barrel shoulder and recoil lug, just like I described when checking the cone depth. If, for example, the feeler gauges read .057″ we know that is the exact depth needed to achieve headspace. Most lathe tail stocks are graduated in thousandths of an inch, so it is an easy matter to run the reamer in the correct amount. Now is the time to be careful and take your time. If you run the reamer in too far, then the barrel will have excess headspace. If this happens the barrel shoulder should be set back the proper amount and the cone depth re-established. After obtaining the correct headspace, as checked with “go” and “no-go” gauges, I polish the chamber with 220 grit paper wrapped around a wooden dowel followed by 400 grit. I’ll spin the barrel much faster while doing this too, about 500 RPM. I’ll also polish the cone and threads a little with the same paper at this time. We all know that prettier shoots better, don’t we? The next step is fitting the muzzle brake. After successfully fitting and chambering the barrel, cutting threads for and fitting a brake will seem like child’s play. The brake manufacturer should be able to supply the correct dimensions and thread pitch for the brake. If not they can be easily measured with a dial caliper and thread pitch gauge. Its important to have the shoulder on the barrel, that the brake butts up against, cut clean and square with the bore or accuracy could suffer. For this reason I cut these threads either between centers or with a live center in the muzzle and a the receiver threads held in the chuck. Equally important is having the barrel end faced of cleanly and square with the bore. This is the equivalent to the crown on a barrel without a brake and is paramount to top flight accuracy. The crown on a barrel should be 100% burr free. This can be checked by pushing a cotton patch through the barrel and looking for any lint hanging up on the crown. A cotton swab will also tattle on rough edges. The last step then is to polish the exterior of the barrel to the desired finish and have the barrel blued or any other processing performed. It is not important, in my opinion, to have the barrel screwed into the receiver excessively tight. And I like to have an ample quantity of grease on the threads before it is cinched up. An action wrench can be fairly easily made with a lathe and a milling machine. I use hard wood blocks to hold the barrel in a barrel vise. Wrapping the barrel with paper before putting it in the blocks helps prevent scratching the surface. And the blocks still get a good grip on the barrel through the paper. I believe that anyone with reasonable machine shop skills can chamber their own barrel and be quite satisfied with the results. I want to emphasis that there is no “black magic” or secrets involved in getting a first rate, competitive chamber job. Rather, it is just an application of straight forward, basic machining techniques and common sense, that most hobbyists already possess. Legally, a gunowner can perform his own gunsmithing work without first obtaining a federal firearms license. He cannot however, do work for others or sell his own work without having first obtained the license. Some may be aware too that a federal excise tax now applies to custom firearms assembled and machined from component parts. The do-it-yourselfer however is exempt from the tax because he is looked upon as an incidental manufacturer by the ATF. Only those engaged in making a dollar from gunsmithing are liable for the tax. (Click Here for an update effective August 2005.) Aside from saving some money by doing your own gunsmithing work, there is some satisfaction in knowing that the little group you just fired downrange was a direct result of your own labor and ingenuity. Have fun!
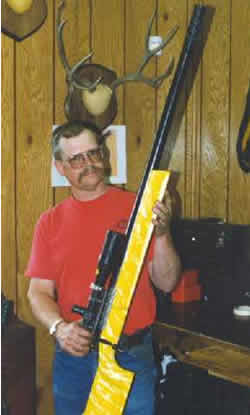
Here is Dan Lilja holding a finished .50 caliber rifle, built using a McBros BMG action,
a McMillan stock, and of course a Lilja barrel.